
A powerful toolkit for creating native graphical user interfaces (GUIs) in Python is wxPython. It not only wraps the native GUI components of the underlying operating system, it also provides a native look and feel for applications.
wxPython is based on the wxWidgets C++ library, which makes it highly portable and efficient.
With the help of this article codemagent is here to walk you through the basics of wxPython, from installation to creating a simple application. We will also explore some of its key features and provide coding examples to help you get started.
Installation
To start using wxPython, you need to install it. The easiest way is to use pip, Python’s package installer. Open your command line or terminal and run:
pip install wxPython
Creating a Simple wxPython Application
Let’s create a simple wxPython application to get a feel for how it works. We will create a basic window with a button.
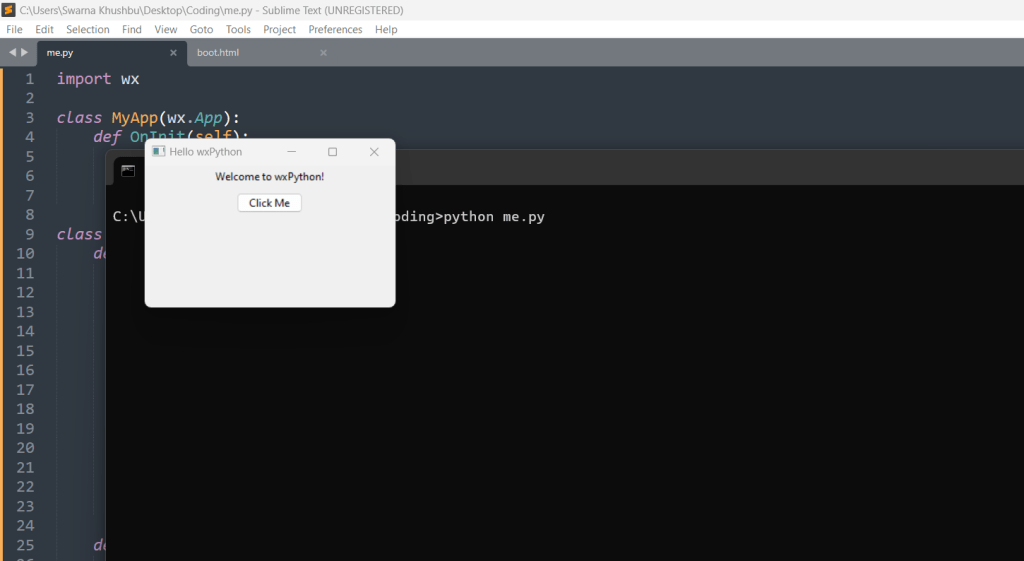
Explanation
- Importing wx: We start by importing the
wxmodule. - Creating the Application Class:
MyAppinherits fromwx.App. TheOnInitmethod initializes the application and creates the main window. - Creating the Frame Class:
MyFrameinherits fromwx.Frame. It sets up the main window, including a panel, a static text, and a button. - Event Binding: The
Bindmethod is used to bind the button click event to theon_button_clickmethod. - Running the Application: The
app.MainLoop()starts the event loop, which waits for user interactions.
Adding More Widgets
wxPython provides a wide range of widgets, including text boxes, sliders, checkboxes, and more. Let’s enhance our example by adding a text box and a checkbox.
import wx

class MyApp(wx.App):
    def OnInit(self):
        frame = MyFrame(None, title="Enhanced wxPython App")
        frame.Show()
        return True

class MyFrame(wx.Frame):
    def __init__(self, parent, title):
        super(MyFrame, self).__init__(parent, title=title, size=(400, 300))
        panel = wx.Panel(self)
        sizer = wx.BoxSizer(wx.VERTICAL)

        self.text = wx.StaticText(panel, label="Welcome to wxPython!")
        sizer.Add(self.text, 0, wx.ALL | wx.CENTER, 5)

        self.button = wx.Button(panel, label="Click Me")
        sizer.Add(self.button, 0, wx.ALL | wx.CENTER, 5)

        self.textbox = wx.TextCtrl(panel)
        sizer.Add(self.textbox, 0, wx.ALL | wx.EXPAND, 5)

        self.checkbox = wx.CheckBox(panel, label="Check Me")
        sizer.Add(self.checkbox, 0, wx.ALL | wx.CENTER, 5)

        self.button.Bind(wx.EVT_BUTTON, self.on_button_click)

        panel.SetSizer(sizer)

    def on_button_click(self, event):
        textbox_value = self.textbox.GetValue()
        checkbox_value = self.checkbox.GetValue()
        self.text.SetLabel(f"Text: {textbox_value}, Checked: {checkbox_value}")

if __name__ == "__main__":
    app = MyApp(False)
    app.MainLoop()
Output:
Explanation
- Text Control: We added a
wx.TextCtrlwidget for user input. - Checkbox: We added a
wx.CheckBoxwidget. - Event Handling: In the
on_button_clickmethod, we retrieve the values from the text box and the checkbox and update the label accordingly.
Layout Management
wxPython uses sizers to manage the layout of widgets. Sizers are flexible and adapt to different screen sizes and resolutions. The wx.BoxSizer arranges widgets vertically or horizontally. Other sizers include wx.GridSizer, wx.FlexGridSizer, and wx.WrapSizer.
import wx

class MyApp(wx.App):
    def OnInit(self):
        frame = MyFrame(None, title="Grid Layout wxPython App")
        frame.Show()
        return True

class MyFrame(wx.Frame):
    def __init__(self, parent, title):
        super(MyFrame, self).__init__(parent, title=title, size=(400, 300))
        panel = wx.Panel(self)
        grid = wx.GridSizer(2, 2, 10, 10)

        self.text1 = wx.StaticText(panel, label="Text 1")
        self.text2 = wx.StaticText(panel, label="Text 2")
        self.text3 = wx.StaticText(panel, label="Text 3")
        self.text4 = wx.StaticText(panel, label="Text 4")

        grid.AddMany([(self.text1, 0, wx.EXPAND),
                      (self.text2, 0, wx.EXPAND),
                      (self.text3, 0, wx.EXPAND),
                      (self.text4, 0, wx.EXPAND)])

        panel.SetSizer(grid)

if __name__ == "__main__":
    app = MyApp(False)
    app.MainLoop()
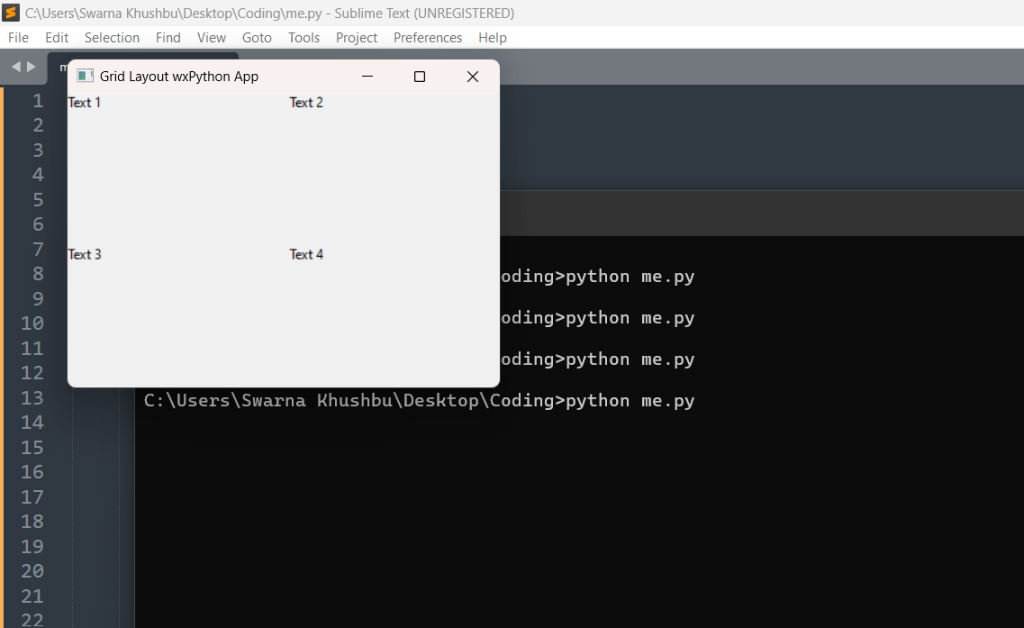
Example: Grid Layout
Explanation
- GridSizer: We used
wx.GridSizerto create a grid layout with 2 rows and 2 columns, with a 10-pixel gap between each cell. - Adding Widgets: The
AddManymethod adds multiple widgets to the grid.
Event Handling
Event handling is a crucial aspect of GUI programming. wxPython provides a robust event system where events can be bound to widget methods.
Example: Mouse and Keyboard Events
import wx

class MyApp(wx.App):
    def OnInit(self):
        frame = MyFrame(None, title="Event Handling wxPython App")
        frame.Show()
        return True

class MyFrame(wx.Frame):
    def __init__(self, parent, title):
        super(MyFrame, self).__init__(parent, title=title, size=(400, 300))
        panel = wx.Panel(self)
        panel.Bind(wx.EVT_LEFT_DOWN, self.on_left_click)
        panel.Bind(wx.EVT_KEY_DOWN, self.on_key_press)

        panel.SetFocus()  # To capture keyboard events, panel must have focus

    def on_left_click(self, event):
        print("Mouse left button clicked at:", event.GetPosition())

    def on_key_press(self, event):
        print("Key pressed:", event.GetKeyCode())

if __name__ == "__main__":
    app = MyApp(False)
    app.MainLoop()
Output:
Explanation
- Mouse Events: The
EVT_LEFT_DOWNevent is bound to theon_left_clickmethod to handle left mouse button clicks. - Keyboard Events: The
EVT_KEY_DOWNevent is bound to theon_key_pressmethod to handle key presses.
Conclusion
wxPython is a versatile and powerful toolkit for building native-looking GUIs in Python. Its comprehensive set of widgets, sizers for layout management, and robust event handling system make it suitable for a wide range of applications. Whether you’re building a simple tool or a complex application, wxPython provides the tools you need to create a professional and user-friendly interface. With the examples and explanations provided, you should now have a solid foundation to start developing your own wxPython applications.


Leave a Reply