Face & Hand Landmarks Detection using Python with Mediapipe and OpenCV is a fascinating way to explore the world of computer vision. With this technology, we can detect and track key points on the face and hands in real-time, allowing for exciting applications like gesture recognition, augmented reality filters, and more. By combining the power of Python programming with advanced libraries like Mediapipe and OpenCV, we can create innovative solutions that enhance the way we interact with technology.
Required Libraries
- Mediapipe is a cross-platform library developed by Google that provides amazing ready-to-use ML solutions for computer vision tasks.
- OpenCV library in python is a computer vision library that is widely used for image analysis, image processing, detection, recognition, etc.
To install the above libraries, you can write the code below in your terminal
pip install opencv-python mediapipe msvc-runtimeBelow is the step-wise approach for Face and Hand landmarks detection
STEP-1: Let us first Import all the necessary libraries, In our case only two libraries are required.
# Import Libraries
import cv2
import time
import mediapipe as mp
STEP-2: Initializing Holistic model and Drawing utils for detecting and drawing landmarks on the image.
# Grabbing the Holistic Model from Mediapipe and
# Initializing the Model
mp_holistic = mp.solutions.holistic
holistic_model = mp_holistic.Holistic(
	min_detection_confidence=0.5,
	min_tracking_confidence=0.5
)

# Initializing the drawing utils for drawing the facial landmarks on image
mp_drawing = mp.solutions.drawing_utils
STEP-3: Detecting Face and Hand landmarks from the image. Holistic model processes the image and produces landmarks for Face, Left Hand, Right Hand and also detects the Pose of the
- Capture the frames continuously from the camera using OpenCV.
- Convert the BGR image to an RGB image and make predictions using initialized holistic model.
- The predictions made by the holistic model are saved in the results variable from which we can access the landmarks using results.face_landmarks, results.right_hand_landmarks, results.left_hand_landmarks respectively.
- Draw the detected landmarks on the image using the draw_landmarks function from drawing utils.
- Display the resulting Image.
# (0) in VideoCapture is used to connect to your computer's default camera
capture = cv2.VideoCapture(0)

# Initializing current time and precious time for calculating the FPS
previousTime = 0
currentTime = 0

while capture.isOpened():
	# capture frame by frame
	ret, frame = capture.read()

	# resizing the frame for better view
	frame = cv2.resize(frame, (800, 600))

	# Converting the from BGR to RGB
	image = cv2.cvtColor(frame, cv2.COLOR_BGR2RGB)

	# Making predictions using holistic model
	# To improve performance, optionally mark the image as not writeable to
	# pass by reference.
	image.flags.writeable = False
	results = holistic_model.process(image)
	image.flags.writeable = True

	# Converting back the RGB image to BGR
	image = cv2.cvtColor(image, cv2.COLOR_RGB2BGR)

	# Drawing the Facial Landmarks
	mp_drawing.draw_landmarks(
	image,
	results.face_landmarks,
	mp_holistic.FACEMESH_CONTOURS,
	mp_drawing.DrawingSpec(
		color=(255,0,255),
		thickness=1,
		circle_radius=1
	),
	mp_drawing.DrawingSpec(
		color=(0,255,255),
		thickness=1,
		circle_radius=1
	)
	)

	# Drawing Right hand Land Marks
	mp_drawing.draw_landmarks(
	image,
	results.right_hand_landmarks,
	mp_holistic.HAND_CONNECTIONS
	)

	# Drawing Left hand Land Marks
	mp_drawing.draw_landmarks(
	image,
	results.left_hand_landmarks,
	mp_holistic.HAND_CONNECTIONS
	)

	# Calculating the FPS
	currentTime = time.time()
	fps = 1 / (currentTime-previousTime)
	previousTime = currentTime

	# Displaying FPS on the image
	cv2.putText(image, str(int(fps))+" FPS", (10, 70), cv2.FONT_HERSHEY_COMPLEX, 1, (0,255,0), 2)

	# Display the resulting image
	cv2.imshow("Facial and Hand Landmarks", image)

	# Enter key 'q' to break the loop
	if cv2.waitKey(5) & 0xFF == ord('q'):
		break

# When all the process is done
# Release the capture and destroy all windows
capture.release()
cv2.destroyAllWindows()
The holistic model produces 468 Face landmarks, 21 Left-Hand landmarks, and 21 Right-Hand landmarks. The individual landmarks can be accessed by specifying the index of the required landmark. Example: results.left_hand_landmarks.landmark[0]. You can get the index of all the individual landmarks using the below code:
# Code to access landmarks
for landmark in mp_holistic.HandLandmark:
	print(landmark, landmark.value)

print(mp_holistic.HandLandmark.WRIST.value)
HandLandmark.WRIST 0
HandLandmark.THUMB_CMC 1
HandLandmark.THUMB_MCP 2
HandLandmark.THUMB_IP 3
HandLandmark.THUMB_TIP 4
HandLandmark.INDEX_FINGER_MCP 5
HandLandmark.INDEX_FINGER_PIP 6
HandLandmark.INDEX_FINGER_DIP 7
HandLandmark.INDEX_FINGER_TIP 8
HandLandmark.MIDDLE_FINGER_MCP 9
HandLandmark.MIDDLE_FINGER_PIP 10
HandLandmark.MIDDLE_FINGER_DIP 11
HandLandmark.MIDDLE_FINGER_TIP 12
HandLandmark.RING_FINGER_MCP 13
HandLandmark.RING_FINGER_PIP 14
HandLandmark.RING_FINGER_DIP 15
HandLandmark.RING_FINGER_TIP 16
HandLandmark.PINKY_MCP 17
HandLandmark.PINKY_PIP 18
HandLandmark.PINKY_DIP 19
HandLandmark.PINKY_TIP 20
0
Full Code
# Import Libraries
import cv2
import time
import mediapipe as mp

# Grabbing the Holistic Model from Mediapipe and Initializing the Model
mp_holistic = mp.solutions.holistic
holistic_model = mp_holistic.Holistic(
    min_detection_confidence=0.5,
    min_tracking_confidence=0.5
)

# Initializing the drawing utils for drawing the facial landmarks on image
mp_drawing = mp.solutions.drawing_utils

# (0) in VideoCapture is used to connect to your computer's default camera
capture = cv2.VideoCapture(0)

# Initializing current time and previous time for calculating the FPS
previousTime = 0
currentTime = 0

while capture.isOpened():
    # Capture frame by frame
    ret, frame = capture.read()

    # Resize the frame for better view
    frame = cv2.resize(frame, (800, 600))

    # Converting from BGR to RGB
    image = cv2.cvtColor(frame, cv2.COLOR_BGR2RGB)

    # Making predictions using holistic model
    # To improve performance, optionally mark the image as not writeable to
    # pass by reference.
    image.flags.writeable = False
    results = holistic_model.process(image)
    image.flags.writeable = True

    # Converting back the RGB image to BGR
    image = cv2.cvtColor(image, cv2.COLOR_RGB2BGR)

    # Drawing the Facial Landmarks
    mp_drawing.draw_landmarks(
        image,
        results.face_landmarks,
        mp_holistic.FACEMESH_CONTOURS,
        mp_drawing.DrawingSpec(
            color=(255, 0, 255),
            thickness=1,
            circle_radius=1
        ),
        mp_drawing.DrawingSpec(
            color=(0, 255, 255),
            thickness=1,
            circle_radius=1
        )
    )

    # Drawing Right hand Landmarks
    mp_drawing.draw_landmarks(
        image,
        results.right_hand_landmarks,
        mp_holistic.HAND_CONNECTIONS
    )

    # Drawing Left hand Landmarks
    mp_drawing.draw_landmarks(
        image,
        results.left_hand_landmarks,
        mp_holistic.HAND_CONNECTIONS
    )

    # Calculating the FPS
    currentTime = time.time()
    fps = 1 / (currentTime - previousTime)
    previousTime = currentTime

    # Displaying FPS on the image
    cv2.putText(image, str(int(fps)) + " FPS", (10, 70), cv2.FONT_HERSHEY_COMPLEX, 1, (0, 255, 0), 2)

    # Display the resulting image
    cv2.imshow("Facial and Hand Landmarks", image)

    # Press 'q' to break the loop
    if cv2.waitKey(5) & 0xFF == ord('q'):
        break

# When all the process is done
# Release the capture and destroy all windows
capture.release()
cv2.destroyAllWindows()

# Code to access landmarks
for landmark in mp_holistic.HandLandmark:
    print(landmark, landmark.value)

print(mp_holistic.HandLandmark.WRIST.value)
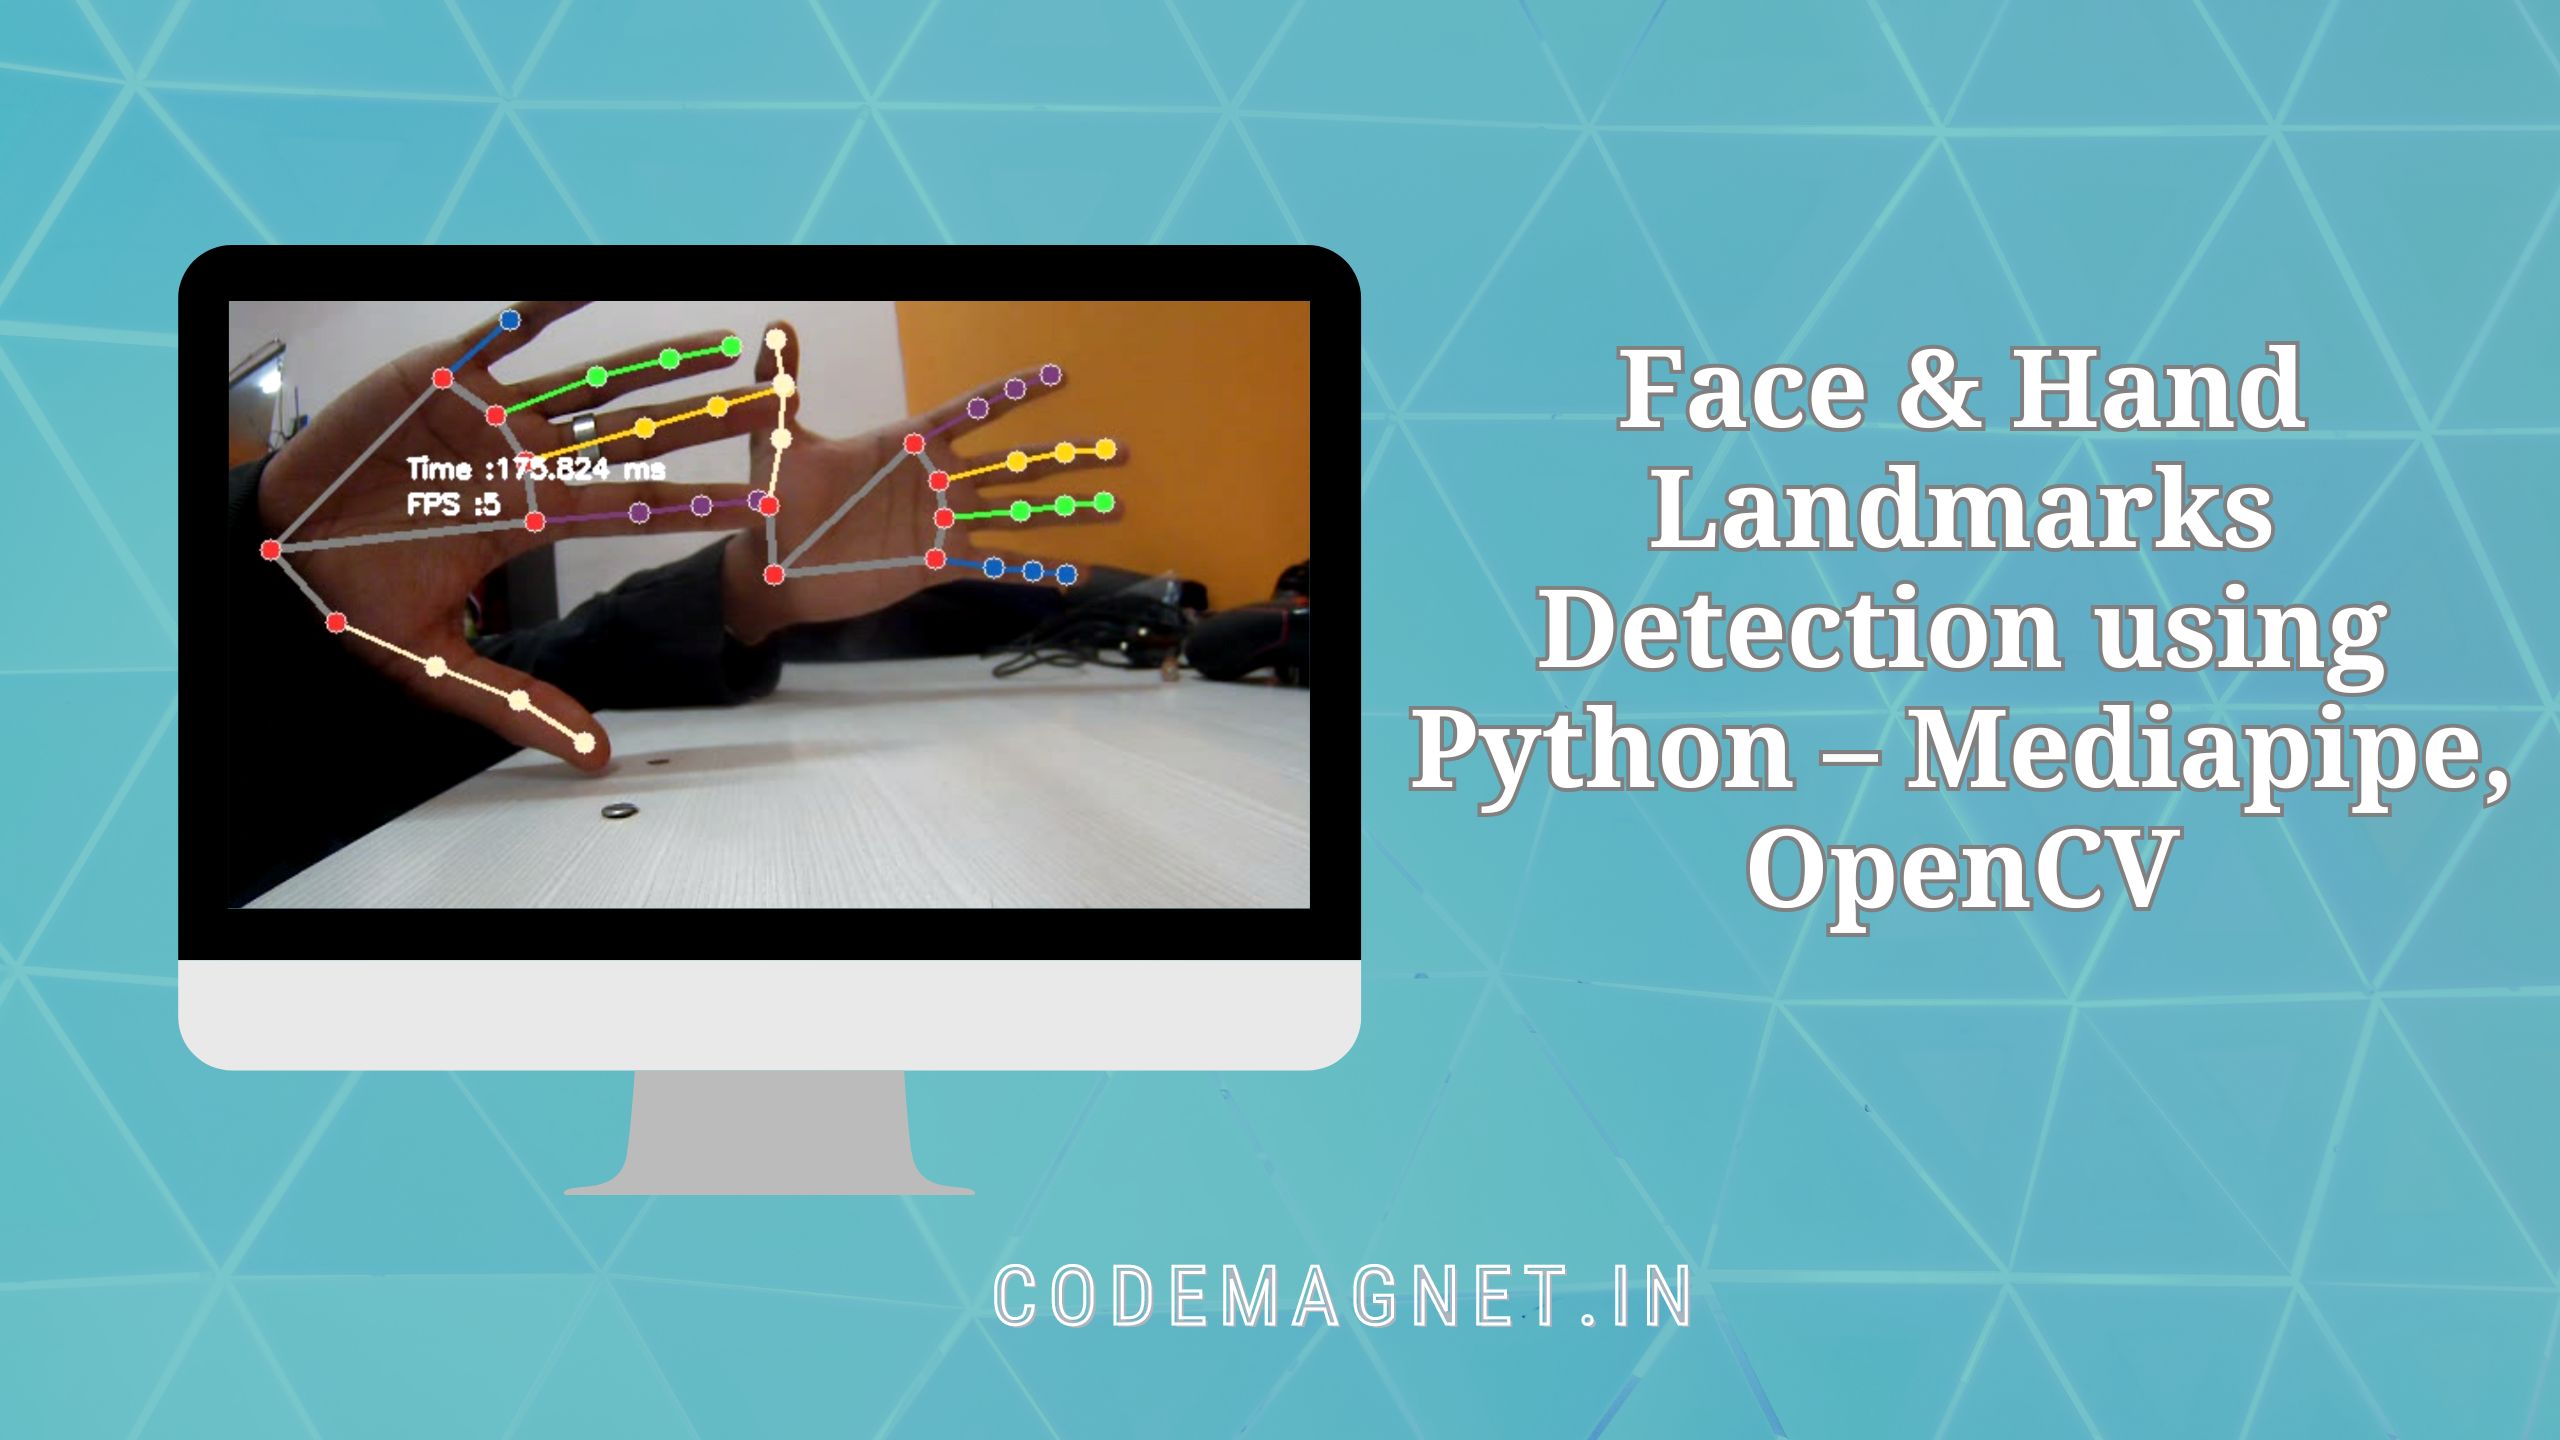
Output:

Explanation of the whole code:
import cv2: This line imports the OpenCV library, which is used for image and video processing.import time: This line imports the time module, which is used to work with time-related functions.import mediapipe as mp: This line imports the Mediapipe library and aliases it asmpfor easier use in the code.mp_holistic = mp.solutions.holistic: This line accesses theholisticmodel from the Mediapipe library and assigns it to the variablemp_holistic.holistic_model = mp_holistic.Holistic(...): This line initializes theholistic_modelwith specific parameters (min_detection_confidenceandmin_tracking_confidence) for detecting and tracking body landmarks.mp_drawing = mp.solutions.drawing_utils: This line initializes the drawing utilities for visualizing the detected landmarks on the image.capture = cv2.VideoCapture(0): This line captures video from the default camera (index 0) and assigns it to the variablecapture.previousTime = 0andcurrentTime = 0: These lines initialize variables for calculating frames per second (FPS).while capture.isOpened():: This line starts a loop that continues as long as the video capture is open.ret, frame = capture.read(): This line reads a frame from the video capture and stores it in the variablesretandframe.frame = cv2.resize(frame, (800, 600)): This line resizes the frame to a specific width and height for better visualization.image = cv2.cvtColor(frame, cv2.COLOR_BGR2RGB): This line converts the frame from BGR to RGB color format, which is required by the Mediapipe model.image.flags.writeable = Falseandimage.flags.writeable = True: These lines temporarily mark the image as not writeable and then writeable again, which can improve performance when passing the image to the model.results = holistic_model.process(image): This line processes the image using theholistic_modelto detect body landmarks.image = cv2.cvtColor(image, cv2.COLOR_RGB2BGR): This line converts the processed image back to BGR color format for display.mp_drawing.draw_landmarks(...): These lines draw the detected landmarks (facial and hand) on the image using themp_drawingutilities.currentTime = time.time()andfps = 1 / (currentTime - previousTime): These lines calculate the frames per second (FPS) of the video stream.cv2.putText(...): This line adds the FPS information to the image for display.cv2.imshow(...): This line displays the image with the landmarks and FPS information.if cv2.waitKey(5) & 0xFF == ord('q'): break: This line breaks the loop if the ‘q’ key is pressed.capture.release(): This line releases the video capture.cv2.destroyAllWindows(): This line closes all OpenCV windows.for landmark in mp_holistic.HandLandmark: print(landmark, landmark.value): This code accesses and prints the landmarks detected on the hands.print(mp_holistic.HandLandmark.WRIST.value): This line prints the value of the WRIST landmark.

Conclusion:
In conclusion, Face & Hand Landmarks Detection using Python with Mediapipe and OpenCV opens up a world of possibilities in computer vision. Whether it’s for creating fun effects in video chats, developing advanced user interfaces, or even assisting in medical diagnostics, this technology has the potential to revolutionize how we interact with computers. By harnessing the capabilities of Python and these powerful libraries, developers can create innovative and impactful applications that benefit society as a whole.


Leave a Reply